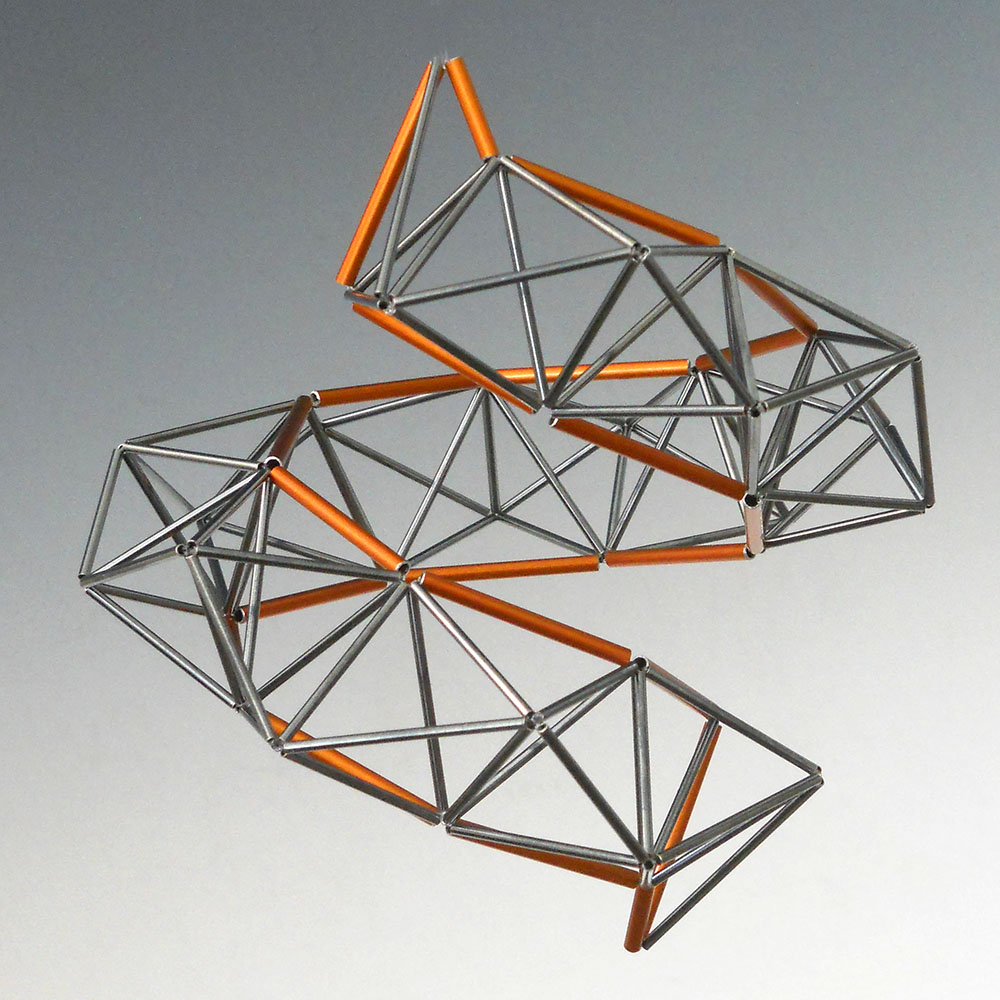
I thought I'd do a post of what I've been up to lately. Another piece where individual structures are interlinked to form a chain. For each link, I made an octahedron out of gold filled tubes, then added 8 long oxidized silver tubes to form another octahedron on the outside of it. It took a while to get it right because so many tubes were ending at the same place. Eventually I added a small round silver bead to separate the outer oct from the inner one, and that seemed to make it work.
The other thing I've been working on this summer is getting my work into galleries. I traveled around and talked to places, and I've gotten a few new ones, so if you're in any of these areas, I hope you'll stop by and take a look:
Albuquerque--Mariposa Gallery, 3500 Central Ave, mariposa-gallery.com
New Orleans--Ariodante Gallery, 535 Julia St, ariodantegallery.com
Chicago--Pistachios, 55 E Grand Ave, pistachiosonline.com
Hi--I'm a beadweaver located in Panama City, FL. Here I'm trying to put down where my ideas are headed, and what I'm working on creatively. You can see more of my work at emiliepritchard.com
Wednesday, August 1, 2018
Saturday, June 2, 2018
new collar with gold
I love this piece! A few posts ago I talked about using some long beads on the outside of one of these collars and how it made the outside edge scallop. I had done it with stone and marble beads and didn't like the mix, but mentioned I might do it with gold tubes. Just finished this one and I really like it. I'm doing more these days with the gold (actually gold-filled) tubes as accents. and I think the contrast with the dark silver really works. For my own use, I mostly stick to the plain oxidized silver pieces, as they're less dressy, as is my lifestyle. But I do like making these silver and gold pieces. They tend to be simpler, and less funky, because when I piece has lots of different shapes and structures, then I think the contrasting color is distraction. But it makes a more classic piece pop.
By the way, after writing the earlier blog post about this structure, I forgot to read it before making this piece, and so had to redo it after getting around 1/3 of the way around. In the post the dark tubes were 28mm and the stone tubes on the outside edges were 20-35-20. In this one I started out using all 28s except for the long 35mm ones on the outside, so no 20s on the outside. That made the outside too long relative to the inside, so it curved was too tightly to fit your neck into it. So I changed the inside tubes to 31mm. It's still a pretty tight circle. If I wanted it a bit longer, instead of round, I'd make2 of the inside tubes in each side 35s instead of 31s. That would add a bit more length, but mostly it would make the curve shallower at that point. There are 12 inside tubes, so I'd change 3,4, 9 and 10. Actually I might just change 3 and 10 (talking to myself here) because you really want to do it when the line of the necklace is 90 degrees from the center point, so you're making it just longer, not wider.
Monday, April 2, 2018
playing with tube lengths
This is a post that, more than most, is just me talking to myself to remember something, because it's about a piece I started to make, but don't like too much and plan to take apart. I've always liked the piece pictured first. It was made with 25mm tubes and quartz beads of around 20mm. I recently bought some malachite beads that are a sort of pinkish tan, and wanted to use them on the outside edges, but I wanted to use 28 mm silver tubes everywhere else. This was partly to make the piece a bit bigger, and partly because I 'm low on 25mm tubes just now. But I found that that combination of lengths made a curve that was way too shallow (obviously, the tightness of the curve is just a matter of how much longer the outside edge is than the inside edge). The outside edges consist of 3 beads in a sort of a straight line and then and then a shift to a new angle. So I went back and put a long(35mm) marble bead in the middle of each set of 3, in place of one of the pink ones. I liked the way it made the set of 3 curve, so you get an interesting outline, as you can see in the bottom picture. But I didn't like the 2 colors. Too jumpy. If I'd used all 28s on the inside I was headed toward a piece that was about 21" on the inside and 26" on the outside. No Pythagorus here, I just laid it on top of a salad plate and the outside curve was pretty close to the outside curve of the plate. A saucer (21") fit the inside. That seems pretty big, so I needed to shorten the inside edge some more. I tried substituting a 20mm on the inside, but you have to do it in pairs, and 2 20mm tubes would have made the curve too tight (there's one 20 in the sample). It looked like the curve with all 28s would have led to a piece with 9 units (maybe 8 and a clasp). If I'd used all 25s on the inside that might have worked. Or, to get a more oval, less round shape, 28s with 4 25s, to sort of make 4 "corners". You could do it with gold tubes on those outside edges, and it would be pretty interesting too.
Sunday, April 1, 2018
Another neckwire piece
I liked playing around with shapes on a neckwire a few weeks ago, so I thought I'd try another. I think the rectangles with gold zigzagging down them worked well. makes for a pretty wearable piece, as well as an attractive one.
Tuesday, March 13, 2018
Developing an idea
I've been making lots of pieces like the first one here: repeats of a structure like an oct, separated by biggish stone beads. And I've varied it by using different structures, but always a repeat of the same one. I've wanted to do 2 things--eliminate the beads and vary the structures. Leaving out the beads means you don't have the color limitation, i. e. you're not limited to wearing it with an outfit that goes with red. There are 2 ways to do this. One would be to put a closed ring between the octs (or whatever structures) Or they could interlink directly with one another. Here I interlinked them. It means that you need to build more structures, as they overlap, but it makes the design tighter. I like this one, and I think pretty soon I'll make another one with the pentagonal shapes done in gold filled beads. As with most of my ideas, I start out being rigidly symmetrical, and then later I play with the idea in a freer, asymmetrical way. Picture 3 shows me doing this design in that way. I think its my best one so far. I also think adding the gold makes the piece more interesting, without limiting the colors you can wear it with. Now I'd like to extend that more asymmetrical, more random approach to some of my very structural pieces.
Sunday, February 11, 2018
A new inspiration
I was looking at the current issue of Metalsmith magazine the other
day. They had an article about Betty Cooke, who's been a well known
jewelry designer for decades now. Besides loving her work, I'm
interested because my niece Kate has worked for her off and on for
several years at her shop, The Store, Ltd., in Baltimore. Anyway the
piece shown here is one of her better known pieces, and I've seen
pictures of it before. But the magazine picture was bigger, and I
noticed that there are silver tubes over the neckwire at the bottom to
control the spacing of the oval elements. That got me thinking, and
luckily I have some tubing large enough to go over 16 ga. wire. Of
course for me the tubes would be part of structures of some sort. After
playing for a while, I came up with the piece below. I'm pretty
pleased with it, although it's not quite as clean and minimalist as the
other one.Actually, thinking about a more minimalist look, I
experimented with what it would look like if I had left out the 2 small
diamond shaped pieces that ard between the 3 larger pieces. What I did
was to take my photo of the necklace and photoshop them out to see what
It would look like. The photoshopping was really crude, but it did give
me an idea of what it would be. I decided I liked it better the way it
is, but it was an interesting experiment. I'll be doing more with this
idea.Wednesday, December 6, 2017
changing necklaces
This post is essentially an addendum to my last post. I've done a couple of art festivals in recent weeks, and I'm reacting to some problems that showed up. Basically, I tend to size things to myself. I have a pretty small neck, so that means that what I think of as a short necklace is actually too short for lots of people. For starters, the necklace I just wrote about, the one with octahedra and floating pearls--as I said, it was based on a necklace of 22 octahedra, but, because I was running out of 25mm tubes, I made this one out of 20 octs. Then I made up some of the lost length by making the tets at either end longer. Mistake. I've now redone it with an extra oct at each end that ends with a 14mm equilateral triangle to get some taper. That gets us back to 22 octs, and I put a 20mm tet at each end. Even for a small neck, it's a better size. Then, to accommodate larger people, I added a 2" extender chain. I'm going back and adding extender chains to lots of my necklaces.
I've also had a tendency to continue a structure or pattern right up to the hook and eye at the back, without any taper or change of structure. This one is a good example. I look at it now and say "What was I thinking?" It makes a good picture, but when you put it on there are these big elephant ears poking out in back. They don't want to lie flat the way the ones in front do, and they're just awkward. More redoing.
Sunday, November 12, 2017
octahedra and pearls
Recently I bought some pearls with holes big enough to slide them over my tubes. I decided I wanted to make a neckpiece that was a simple series of octs, ornamented by the pearls. I had made a similar structure using bright silver and colored aluminum tubes a few years ago, and wanted to repeat that structure. So I went to my handy blog, where I keep track of my structures. Here's what I found, from August, 2014: "It's a simple chain of octahedrons. But a chain of octahedrons would normally form a straight line. In order to get the curve you need for a necklace I had to make the triangle on the outside edge longer than the triangle on the inside edge.
Here's where some trig would have come in handy in figuring out just how much longer, but I managed to figure it out with "lesser" math, and it came out right."
It would have been really handy if I had written down just what the lesser math had given me so that I could have reproduced the shape. That, after all, is one of the main reasons I write this blog. Since I didn't do that I started and ripped apart the new piece over and over trying to get the curve I wanted. As you can see I didn't get the same curve as last time; it's a little pointier at the bottom and straighter across at the back but I like it OK. It's also just a bit shorter. That's only because I was running out of 25 mm tubes, so I did just 20 octs instead of 22. Then I made the 2 tets at the back by the clasp longer. Also I now make my own hooks and they're longer than the one I used in the earlier piece. So the overall piece probably isn't that much shorter, but I do think it's a bit shorter.
So as not to make the same mistake twice I'll put down the plan for the curve. The outside triangles are mostly equilateral 25mm triangles. To get more curve I used 28/28/25 mm isosceles triangles at position 1 (at the center), 3, 9 and 10. On the inside the triangles are either 20mm equilateral or, at inits 1, 2, 3 and 6, to tighten the curve, 20/20/25 isosceles. It actually doesn't change things all that much. If I didn't want it to be so pointy at the bottom I could have spread them out more. Also triangle 6 is an equilateral 25mm oct. I CHANGED SOME OF THIS AND WROTE ABOUT IT IN THE NEXT POST.
Friday, October 13, 2017
Playing
On a recent car trip to Chicago, I spent car time building some different structures that I wanted to use as building blocks for a necklace. I wanted just a few elements and ended up with 3 front ones and a curve around the back of the neck . I like it, especially the spiral in the front. But it's kind of a lot of necklace, both long and wide. On a whim I hooked the hook to the ring that's on the spiral, leaving out the last zigzaggy element. Here I have (badly) photoshopped out the element that would be left out. It makes the necklace more asymmetrical, as well as shorter. I like the asymmetry, but it's probably just a bit too short. So if I do cut off the zigzag, I think I'll add one more unit to the curve that goes around the back, so that the end of the spiral element is a bit farther from the neck.
I'm still trying to decide whether to cut off the zigzag. If I do I think I'll turn that element into a pendant. But
looking at the pictures, I like the top one more than I did just trying it on. For one thing I kept trying to shift it around so that the 2 wide points weren't opposite each other. But now I think that having them at almost the same height, but also different shapes, kind of works. It's good to be able to line up the 2 pictures together and see how it looks either way (although taking a selfie as a 68-yr-old is not for the faint of heart).I'd love to know what anyone reading this blog thinks--long version or short?
I'm still trying to decide whether to cut off the zigzag. If I do I think I'll turn that element into a pendant. But
looking at the pictures, I like the top one more than I did just trying it on. For one thing I kept trying to shift it around so that the 2 wide points weren't opposite each other. But now I think that having them at almost the same height, but also different shapes, kind of works. It's good to be able to line up the 2 pictures together and see how it looks either way (although taking a selfie as a 68-yr-old is not for the faint of heart).I'd love to know what anyone reading this blog thinks--long version or short?
Wednesday, September 20, 2017
local exhibit of my work
For those (few) of you who are in the Panama City area, I have an exhibit coming up at the Panama City Publishing Museum, on Beck Ave in St Andrews. There's a Meet the Artist event this Friday from 6:30 till whenever. The picture here is just one of the new pieces I'll be showing.
Thursday, September 14, 2017
Origami idea
This post is about another idea I've had kicking around in the back of my mind for ages. I finally tried it and with interesting results, but they don't lend themselves to a piece I want to make right now. So I'm memorializing it here for later reference. The inspiration--and actually more than inspiration because it's more or less the actual design is a fountain done by Ruth Asawa that's origami done in stainless steel. It's in San Francisco. I've looked at it for a while, but only recently realized that all the triangles in it are right triangles. Actually that makes sense, because it has to come from a flat sheet of, in this case, steel. I reproduced the triangles in tubes and got picture 2. Actually I made one change--I changed each pair of 2 smaller right triangles that are on the edges of the sheet to a single double sized one. But, of course, this isn't origami, and there's no way to make the flat "sheet" of tubes stay "folded.
Then you get picture 2, which is pretty much like the origami structure and stays folded. But the outside shapes are rectangles, and tube rectangles aren't rigid, so in picture 3 I made a pyramid out of each rectangle, and that makes it firm.There's one way my structure has an advantage over origami, in that I can adjust the lengths of my tubes to vary the structures. Mainly I found that by shortening or lengthening the tube that is at the very center of each unit in the flat sheet, you change the angle of the curve. A longer tube in that position gives you a tighter curve, and a shorter tube there gives a shallower curve, or, at some point, no curve at all. So you could make a nice oval shaped necklace by varying the curve.
Friday, September 8, 2017
new ideas for a tet structure

One thing I like about writing this blog is that it lets me memorialize ideas and structures that I might not use right away, but that I don't want to forget. I make notes, but a picture is truly worth a thousand words. Back when I worked with seed beads, and even round stone beads, I would keep structures that I had built but didn't plan to use any time soon. I have drawers full of "interesting" structures, an I'm sure many others of you do too. But the silver tubes are too expensive, both in the cost of the silver tubing and in the time it takes to cut, debur and oxidize them, to do that. So I'll be doing a couple of posts about ideas I've worked with that may or may not turn into something.
I'm finding that the tet (tetrahedron) structure that I've been playing with for a while has some new variations for me. I've learned now to think of it as 3 separate elements, as shown in the top picture. First, at the left of the picture, there's a row of triangles. Then I turn each of the triangles into a tet, in the middle of the picture. Finally I join the top points of the tets together with a zigzag line of tubes. Playing with the different elements affects different parts of the structure.
I've had the idea for a while that if the zigzag outer row alternated between long and short tubes, then the structure would spiral up or down instead of returning to its start like a donut. In pic 2 I turned that idea into a bracelet. This is a piece that I like a lot and will certainly keep and sell. I made 2 of them. The 1st was a tight spiral made by alternating between 28mm and 25mm beads in the outer row. All the rest of the tubes are 25mm. In this 2nd one I alternated between 28 and 22mm tubes, which made the spiral longer, and also made the overall bracelet diameter larger. As I have a small wrist I have a tendency to err on the side of bracelets that are pretty small, and I need to have a wider range.
The last picture is a potential necklace that I like quite a bit, but I did so much ripping and redoing that it has way too many threads hanging out, and I don't think I could ever make a firm enough piece out of it. More importantly, the idea was to put some contrasting color tubes in it to add interest. I used light green tubes, and they just don't show up enough. In the picture you can hardly see them. There's an area at the bottom left and a smaller one midway up the right side, But they barely show. Possibly my mistake was in only changing the color on the top layer of the area, instead of using all colored tubes there.But anyway, back to the structure. That length of the tubes in that outer zigzag row determines how tight the curve is. Longer tubes make for a tighter curve. If the outer tubes are somewhere around 2/3 the length of the other tubes (in a structure that's otherwise equilateral) the structure won't bend at all, but will continue in a straight line. Shorter that that and it curves inward. That means you can put that initial "belt" of triangles in the middle of the structure. Then you build tets on both the inside and the outside, and use short tubes to make a negative curve on the inside and long tubes for a positive curve on the outside. That was the initial idea, and it worked. The trouble and endless redoing came from making it curve and taper properly and also curve over your shoulder the way it should. I've been wanting to take it apart and reuse the tubes, and now that I have a good picture and notes, I won't forget it and I can rip it .
Subscribe to:
Posts (Atom)